


Connecting DocuSign with Microsoft Dynamics 365 CRM is a powerful way to simplify eSignature workflows without writing code or relying on Power Automate. This guide walks you through the process of configuring DocuSign directly in Dynamics 365 CRM for a seamless signing experience.
The DocuSign Dynamics 365 CRM integration enables businesses to automate their document signing workflows directly within the CRM system. By connecting DocuSign to Dynamics 365 CRM, users can send, sign, and monitor documents without ever leaving the CRM interface, improving efficiency and reducing delays.
The DocuSign Dynamics 365 CRM integration empowers teams to streamline signature approvals and maintain complete visibility into document progress—all within the Dynamics 365 environment. This integration reduces manual tasks, enhances compliance, and supports real-time customer engagement.
Prerequisites
> DocuSign Account: Make sure you have an active DocuSign account.
> Dynamics 365 CRM Access: Administrator-level access to your CRM instance is required.
> DocuSign for Dynamics 365 CRM App: Available on Microsoft AppSource.
Step 1: Install the DocuSign for Dynamics 365 CRM App
The first step is to install the DocuSign integration app directly from Microsoft AppSource.
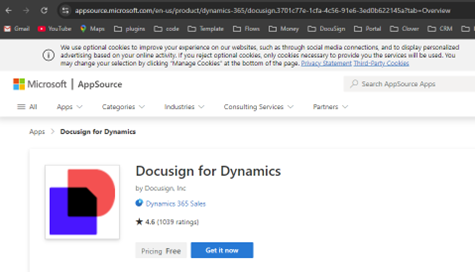
- Go to Microsoft AppSource and search for “DocuSign for Dynamics 365 CRM”.
- Click Get It Now and sign in to your Dynamics 365 CRM environment.
- Follow the prompts to install the DocuSign app.
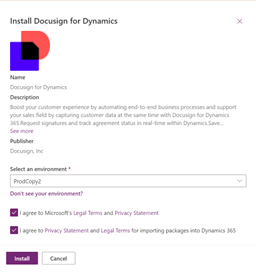

Tip: Install DocuSign app using Global Admin.
Step 2: Configure the DocuSign Connection
Once the app is installed, you need to configure the DocuSign settings to link it with Dynamics 365 CRM.
After setting up the DocuSign Dynamics 365 CRM integration, administrators can manage user access and permissions directly from the CRM. This configuration ensures a secure and compliant environment for document transactions initiated through DocuSign within Dynamics 365 CRM.
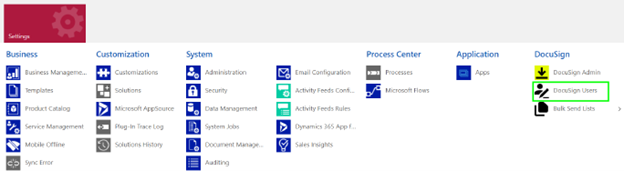
- Go to Settings > DocuSign Settings in Dynamics 365 CRM.
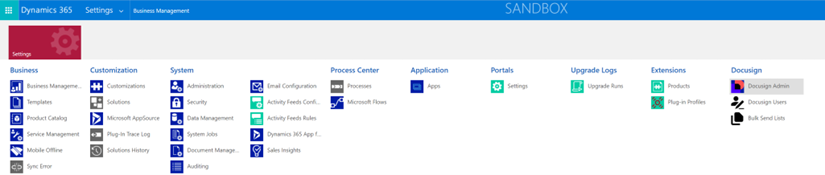
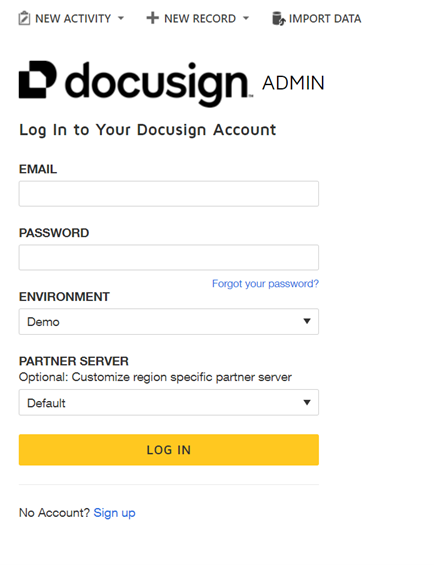
2. Click on DocuSign Admin and DocuSign login window will open.
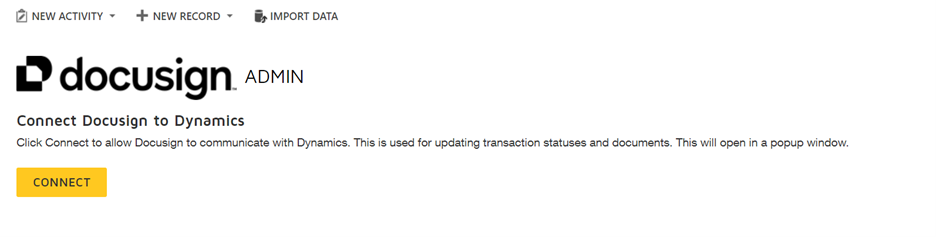
3. Enter your DocuSign credentials and connect. The DocuSign Admin Home page opens.
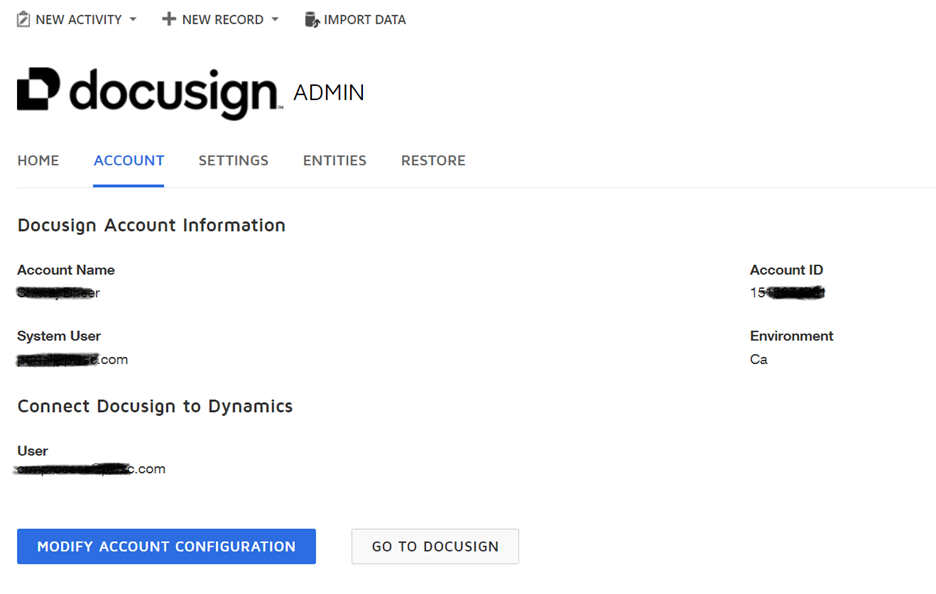
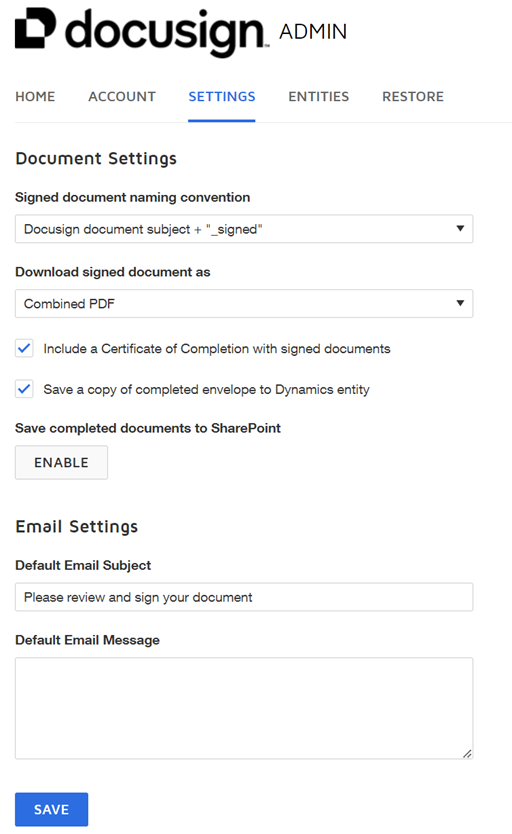
4. Now, you will be able to see your account, settings and entities tabs where you can make the changes as per your requirement.
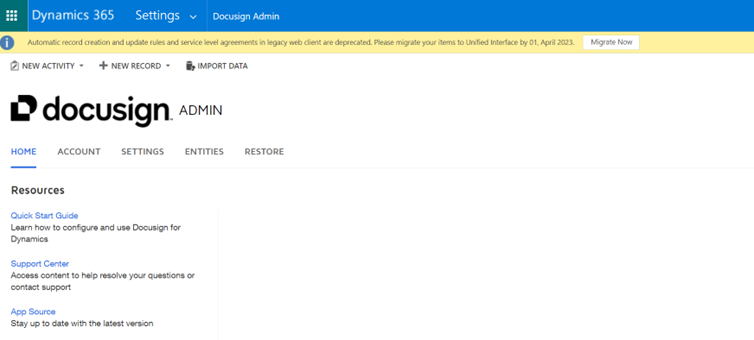
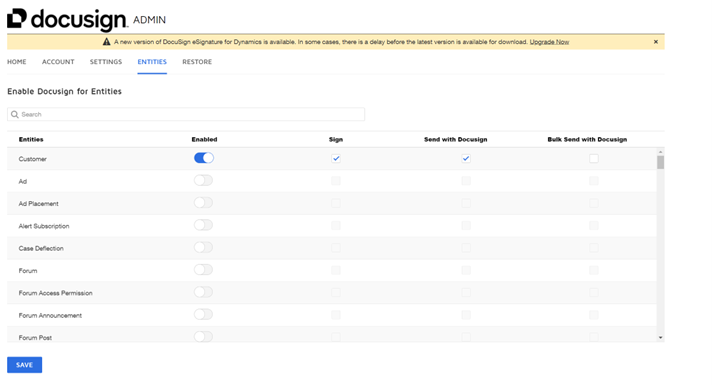
Under Account, you can check your account details. In setting tab, you can do document, email and default message setting and under entities tab you can enable DocuSign for required entities.
Tip: Sign in as an integration admin user with DocuSign admin permissions. Use a service account dedicated to the integration to ensure it remains consistent over time.
Tip: Do configuration using Global Admin.
Step 3: Manage User Access to DocuSign
To enable users to access DocuSign in Dynamics 365, ensure they meet the following requirements:
> They must be members of the DocuSign eSignature account associated with the Dynamics instance. This account is specified in the DocuSign Admin configuration settings.
> They must be assigned the DocuSignUser role in Dynamics.
Basic Requirements for User Access
For Dynamics users to sign documents or request signatures through DocuSign, they need to be members of the DocuSign account specified in DocuSign Admin. As long as they are part of this DocuSign account and use the same email address registered in the Dynamics organization, they will have seamless access to DocuSign features. If their email address differs or they are not members of the DocuSign account, the DocuSign administrator will need to assist.
When a Dynamics 365 CRM user initiates any DocuSign action, the system verifies the user’s presence in DocuSign using their Dynamics email address:
> If the user is a member of the specified DocuSign account, they are added to the DocuSign Users table and can proceed with using the application.
> If the user is not a member of the specified DocuSign account, a message will prompt them to contact the solution administrator for assistance.
Assigning the DocuSignUser Role
> To enable a non-administrative user in Dynamics 365 CRM to access the DocuSign solution, you, as the Dynamics 365 CRM administrator, need to assign the DocuSignUser role to their profile.
> Sign in as a Dynamics 365 CRM administrator.
> Go to Settings > Security.
> Select Users.
> Find and select the user(s) to whom you want to grant access.
> Click Manage Roles, then assign the DocuSignUser role.
To add a new record:
> Click NEW.
>In the System User field, search for and select the user.
> Enter the user’s DocuSign email address in the DocuSign Email field.
> Click SAVE.
Note: There is also a DocuSign Trace role, which is meant for system debugging only; do not assign it to users.
Click OK.

Editing the DocuSign Users Table
> As an administrpdate the DocuSign Users table to add or modify user records, especially if a user has a different email address for their DocuSign account.
> Log in as a Dynamics 365 CRM administrator.
> Navigate to Settings > DocuSign Users.
To edit an existing record:
> Find and select the user record, then click Edit.
> Update the DocuSign Email field to match the email address used in their DocuSign account.
> Click SAVE.
To add a new record:
>Click NEW.
> In the System User field, search for and select the user.
> Enter the user’s DocuSign email address in the DocuSign Email field.
> Click SAVE.
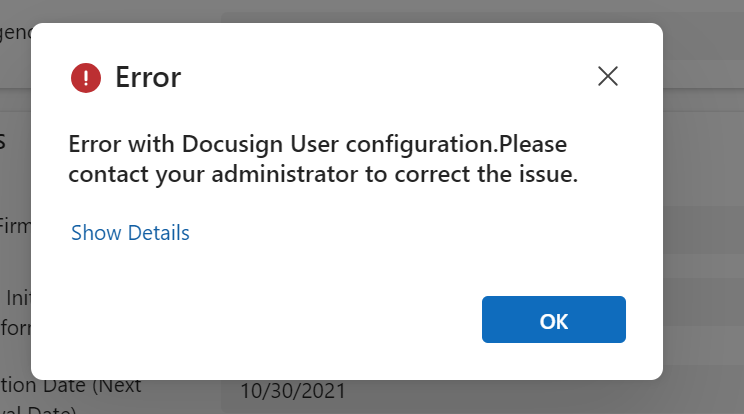
The next time the user uses the DocuSign solution, the system will verify if the email in the DocuSign Users record matches a member in the DocuSign account. If the information is correct, the user will be able to use the solution, and the table record will automatically update with additional DocuSign details. Otherwise, user will get below error.
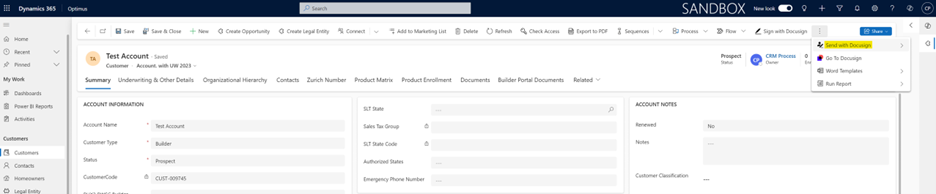
Step 4: Send an Envelope
- Open the entity record for which you want to send the envelope. Make sure this entity is enabled to send envelopes if not then check step2.
- In the command bar, select Send with DocuSign and then Get Signatures.

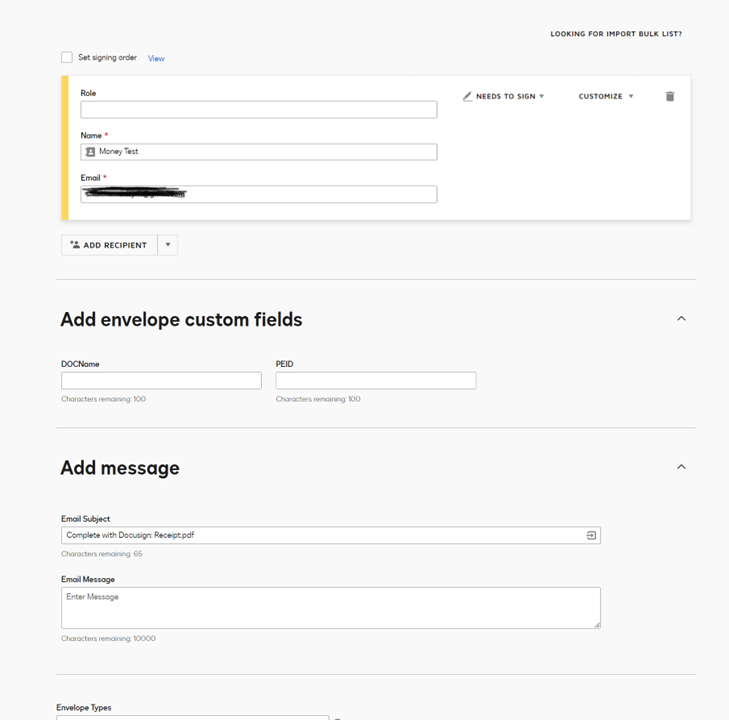
3. Files attached e automatically included in the envelope. If SharePoint integration is enabled, all related SharePoint documents are also added. You can select which files to send by using the checkboxes in the SELECT DOCUMENT(S) TO SEND window.
4. Contacts linkedatically included in the envelope. You can choose recipients from the record’s contacts or from other contacts available in Dynamics. To add additional contacts, click Add Recipients and use the checkboxes to select them.
5. When you are doiles, select OPEN DOCUSIGN to open your DocuSign account and continue the sending process.
6. From here you can add or edit your message to all recipients and do the adjustments with subject as per the requirement.
7. Moreover, you can add DocuSign fields from fields view.
8. After all these changes you can hit send button to send document for signing.
Step 5: Sign Documents
- Open entity records in CRM for which you want to sign the documents.
- In the command bar, click Sign with DocuSign

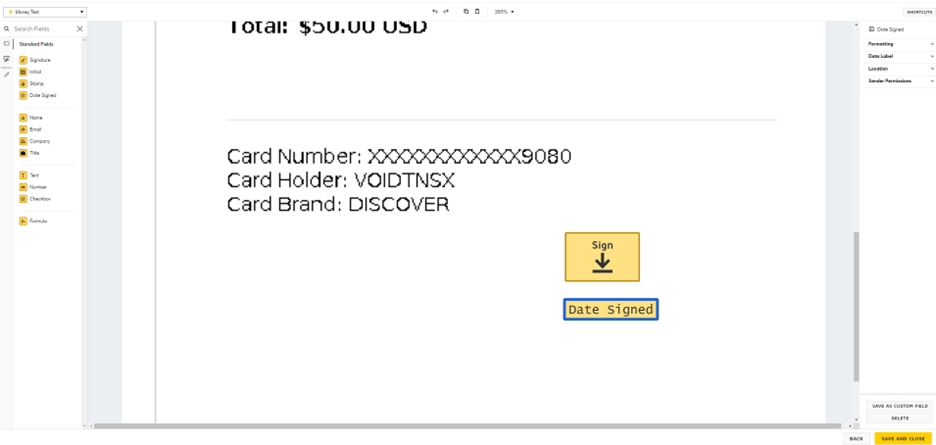
3. A new tab opens in DocuSign, allowing you to add fields to the document and sign.By default, all files attached in the Notes of the Dynamics record are included in the DocuSign envelope.
4. Click Continue to add your fields, such as signature, date signed, or custom text fields.
5. In the Fields palette on the left side of the window, select the field you wish to add, then drag and drop it to the desired position within the document.
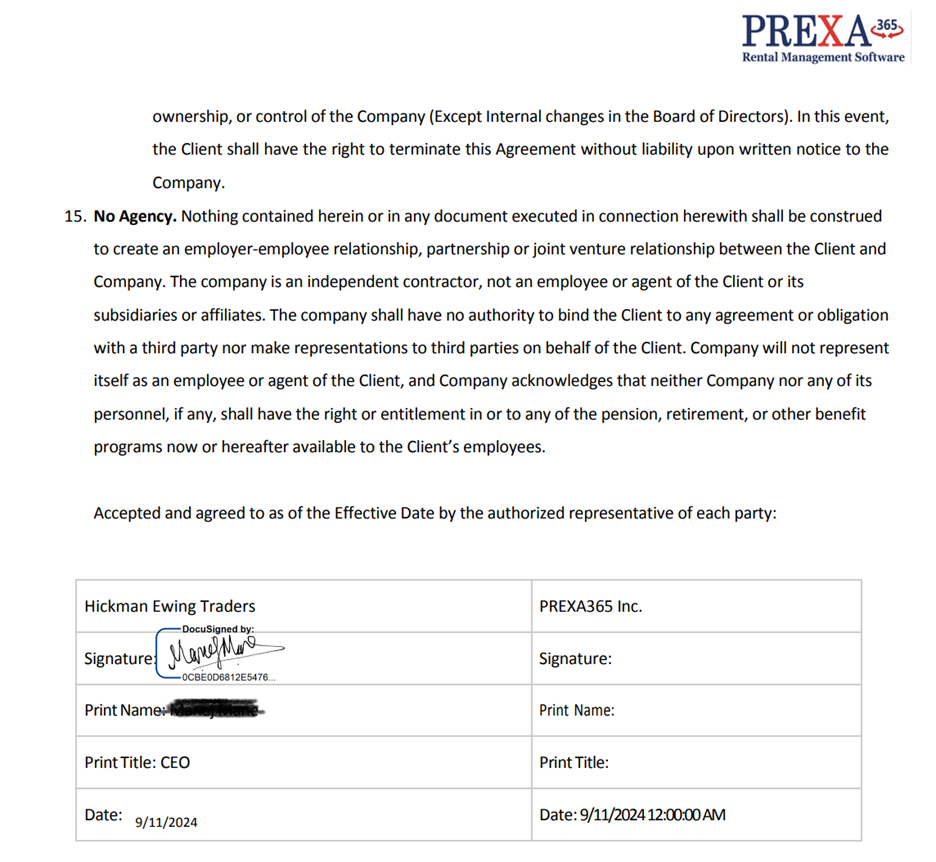
6. Click Finish to process with DocuSign. The signed document is then saved as a PDF file in the Notes section of the entity where you initiated the signing.
How can I access the Version History in Power Automate?
Open the flow in New Designer mode, go to the toolbar, and click on the Version History option to view previous versions.
What information does Version History show in Power Automate?
Version History displays saved versions with timestamps and any notes or comments to help identify the right version.
Can I restore an older version of my Power Automate flow?
Yes, select the version you wish to restore, click on it, and choose "Restore" to revert to a previous state.
What should I do after restoring a previous version of my flow?
After restoring, save, publish, and run a test to verify that all settings and parameters are as expected.
Will restoring a previous version affect other active flows?
No, restoring a flow only affects the specific flow you are working on, without impacting other flows.
How often should I use Version History to save flow changes?
Regularly saving flow changes helps maintain a useful Version History for easy restoration if needed.