


Uploading documents to Dynamics 365 using PowerApps can be a secure and streamlined experience with the right setup. In this guide, we demonstrate how to set up secure file upload in PowerApps so users can easily attach documents to records while maintaining data integrity.
Whether you’re configuring a new PowerApps Portal or integrating with an existing Dynamics 365 system, this method ensures seamless file handling without compromising security. This tutorial is perfect for administrators and developers seeking to upload files to Dynamics 365 securely via PowerApps Portal.

Step 1: Create the File Upload Form
In this example, we’re creating a simple form with a file input field and an upload button. This form will allow users to select and upload files to Dynamics 365 directly from the Power Apps Portal. For more advanced file handling capabilities, you can explore the PCF File Uploader Control designed for PowerApps.
The HTML code below creates a section that includes:
– An `input` element of `type=”file”` where users can choose the file they want to upload.
– A button that triggers the file upload when clicked.
Here’s the HTML structure:
                           <section>

                               <div class="container" >
                                       <div class="row" >
                                           <div class="col-md-12" >
                                               <div class="form-group" >
                                                   <input type="file" id="resume" class="form-control"/ >
                                               </div >
                                               <div class="form-group" >
                                                   <button class="form-control" onclick="upload()" >Upload </button >
                                               </div >
                                           </div >
                                       </div >
                               </div >
                           </section >

Step 2: Get the Authentication Token
To upload files securely, we first need to retrieve an authentication token. Learn how Microsoft Sentinel enhances security in cloud applications. The code below demonstrates how to create a `getToken` function, which uses the `shell.getTokenDeferred()` method to obtain the token. This token will be required to authenticate the file upload request to the Dynamics 365 API.
Note: It’s crucial to follow secure file transfer practices. Refer to OWASP’s File Upload Cheat Sheet for comprehensive security guidelines.
                            const getToken = function () {
                                return new Promise((resolve, reject) => {
                                    shell.getTokenDeferred().done(token => {
                                        resolve(token);
                                    }).fail(error => {
                                        reject(error);
                                    });
                                });
                            }
Step 3: Implement the `uploadFile` Function
The `uploadFile` function is where the main file upload logic resides. Here’s a breakdown of how this function works:
- File Selection: The function retrieves the file from the file input element by using its `ID`.
- Token Retrieval: It calls the `getToken` function to get an authentication token.
- File Validation: If no file is selected, it returns a message indicating no file was uploaded.
- File Processing: The function reads the file as an ArrayBuffer, which allows it to be uploaded as a binary data stream.
- API Call: Using the Fetch API, it sends a `PATCH` request to Dynamics 365’s Web API with the ArrayBuffer as the `body`. It includes the authentication token and the file name in the headers.
                            const uploadFile = async function (fileInputID, fieldLogicalName, guid) {
                                return new Promise(async (resolve, reject) => {
                                    const fileInput = document.getElementById(fileInputID);
                                    const file = fileInput.files[0];
                                    const token = await getToken();
                                    if (!file) {
                                        resolve({ "success": "No file selected." });
                                        return;
                                    }
                                    const fileReader = new FileReader();
                                    fileReader.readAsArrayBuffer(file);
                                    fileReader.onload = async function (event) {
                                        const fileArrayBuffer = event.target.result;
                                        const fileName = file.name;
                                        try {
                                            const apiUrl = `/_api/contacts(${guid})/${fieldLogicalName}`;
                                            const response = await fetch(apiUrl, {
                                                method: 'PATCH',
                                                headers: {
                                                    'Content-Type': 'application/octet-stream',
                                                    'x-ms-file-name': fileName,
                                                    '__RequestVerificationToken': token
                                                },
                                                body: fileArrayBuffer
                                            });
                                            if (!response.ok) {
                                                throw new Error(`Error uploading file: ${response.statusText}`);
                                            }
                                            resolve({ "success": "File uploaded successfully." });
                                        } catch (error) {
                                            reject({ "error": `Error uploading file: ${error}` });
                                        }
                                    };
                                    fileReader.onerror = function () {
                                        reject({ "error": "Failed to read the file. Please try again." });
                                    };
                                });
                            };
Step 4: Upload File on Button Click
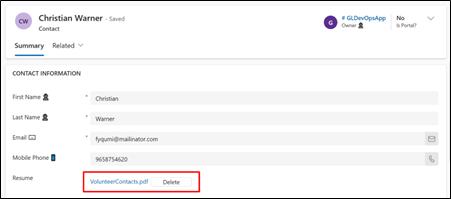
- The `upload` function, triggered by the button click, calls `uploadFile` with the file input ID (`resume`) and the field logical name in Dynamics 365 where the file will be stored (e.g., `av_resume`) and the GUID of record where we will store the file. In our case we are taking GUID of logged in person and will attach file in Resume field.
                            async function upload() {
                              const recordGUID =  {{ user.id }}; //we will take GUID of loggedin person
                              var res = await uploadFile('resume', 'av_resume', recordGUID);
                              console.log(res);
                            }

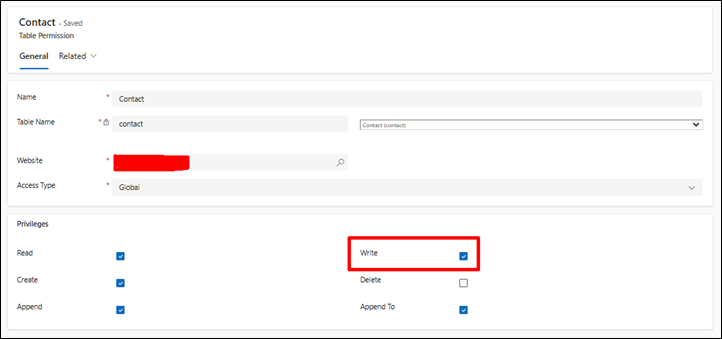
Make sure you have Write privilege for related entity. If you are migrating from on-premise to cloud, explore Cloud Enablement Services for seamless integration.
Need a secure way to manage file uploads in Power Apps or Dynamics 365?
Alphavima helps you set up safe, compliant, and user-friendly file upload features across Microsoft applications.
FAQs
How Does PowerApps Handle Secure File Uploads for Dynamics 365?
Secure File Upload in PowerApps is implemented using the Power Apps Portal combined with the Dynamics 365 Web API. When a user selects a file through a portal form, the file data is read as a Base64 string using the JavaScript FileReader API, then transmitted to Dynamics 365 via an authenticated API call. Azure AD or Azure AD B2C handles identity verification to ensure only authorised portal users can upload files. The uploaded files are stored as annotations (notes) against the target Dynamics 365 record, such as a Contact, Account, or custom entity. This architecture keeps file management within the Dynamics 365 data environment while providing a user-friendly upload interface on the portal. Learn more about the Power Apps Portal Web API.
Which Attachment Types Are Supported in the Customer Portal?
Power Apps Portal supports a wide range of file types for upload to Dynamics 365, though the specific types allowed depend on how you configure the file input and any validation logic applied using JavaScript. Common document types such as PDF, Word (.docx), Excel (.xlsx), and plain text files work reliably. Image formats including PNG, JPEG, and GIF are also supported. It is important to implement client-side and server-side validation to restrict uploads to approved file types and enforce a maximum file size limit. This reduces the risk of uploading malicious files or excessively large attachments that could affect system performance. The Dynamics 365 annotations entity supports attachments up to 128 MB by default, though administrators can adjust this limit through the system settings configuration panel.
What Permissions and Prerequisites Are Needed for PowerApps Upload?
Users must have appropriate Dynamics 365 security roles that grant write access to the annotation or note entity associated with the target record type. On the portal side, the web role assigned to the authenticated user must have table permissions configured to allow Create operations on the annotations table. Additionally, the Power Apps Portal must be connected to the correct Dynamics 365 environment and the Web API feature must be enabled in the portal settings. Administrators should also ensure that the portal's site settings include the correct API endpoint base URL and that CORS policies are configured to allow requests from the portal domain to the Dynamics 365 Web API host.
Can Multiple Attachments Be Linked to a Single CRM Record?
Yes. Since each uploaded document is stored as a separate annotation record linked to the parent entity record via a lookup relationship, multiple annotations can reference the same Dynamics 365 record. This means a single Account, Contact, or Case record can have an unlimited number of file attachments associated with it, subject only to the overall storage quota of your Dynamics 365 environment. When building the portal interface, you can allow sequential uploads by repeating the JavaScript upload function for each selected file, or implement a multi-file selection input that iterates through the file array and makes one API call per file.
Does This Approach Work with Both Online and On-Premise Deployments?
The Power Apps Portal and Web API approach described here applies specifically to Dynamics 365 Online (cloud-hosted) environments. Power Apps Portals is a cloud-native service managed by Microsoft and requires an active Dynamics 365 Online subscription. On-premise Dynamics 365 deployments do not support Power Apps Portals natively. Organisations running on-premise versions would need to implement a custom web application that communicates with the on-premise Dynamics 365 API directly, which requires significantly more development effort and infrastructure management compared to the cloud portal approach.
Is Microsoft Azure Required for This Portal Integration?
Yes. This portal-based upload solution relies on Microsoft Azure for identity management and security token generation, making it a critical component in the upload pipeline. Azure Active Directory (Azure AD) or Azure B2C issues the authentication tokens that the portal passes with each Web API request to Dynamics 365. Without a valid Azure-issued token, the Dynamics 365 Web API will reject the request with a 401 Unauthorised error. Azure is also involved in the Power Apps Portal infrastructure itself, as the portal runs on Azure as a managed service. For organisations that prefer not to use Azure AD, alternative token-based authentication mechanisms may be configured, but this requires custom development and is not the standard supported path for most Dynamics 365 portal deployments.
What Steps Configure the Input Control and Data Validation?
Setting up the file input field in Power Apps Portal involves adding an HTML file input element to the portal page or web template, then writing JavaScript to handle the file selection event. The JavaScript reads the selected file using the FileReader API, converts the file data to a Base64 encoded string, and prepares the payload for the Dynamics 365 Web API call. An HTTP POST request is then made to the annotations endpoint, including the entity type, record GUID, file data, subject, and MIME type fields. The portal's table permissions must be configured to allow the authenticated user's web role to create annotation records against the target entity. Testing thoroughly in a sandbox environment using the browser's developer console helps catch errors in the API payload structure before deploying to production users.
How Is Secure File Upload in PowerApps Authenticated and Protected?
Secure File Upload in PowerApps uses Azure AD token-based authentication to protect every API call made from the portal to Dynamics 365. The portal retrieves an authentication token using the built-in shell.getTokenDeferred() function, which returns the current user's Azure-issued bearer token. This token is included in the Authorization header of every Web API request, ensuring that Dynamics 365 validates the user's identity and permissions before accepting the file. Entity-level and field-level security in Dynamics 365 provides a second layer of access control, restricting which record types a portal user is permitted to write to. Our certified Microsoft team at AlphaVima is ready to help. Explore our Power Apps development services in Toronto, Microsoft Copilot Studio consulting, and nonprofit CRM solutions.