


Learn QuickBooks Integrations with Azure Functions using .NET SDK Dynamics 365 CRM
In this blog, we will guide you through the integration of QuickBooks.Net SDK and Azure Functions. This integration will add data into QuickBooks from Dynamics 365 CRM. The article will walk you through the end-to-end functionality from Dynamics 365 CRM to QuickBooks using Azure Functions as an intermediary.

What Is Azure Functions?
Azure Functions is a cloud service providing the complete infrastructure to run your applications in any language. Developers can focus on writing the code while Azure Functions handles the rest by providing serverless computing on the Azure cloud service.
We can use Azure Functions to build web APIs, respond to database changes, process IoT streams, manage message queues, etc.
As a server-less solution, Azure Functions allows you to write less code, maintain less infrastructure, and reduces costs. You need only to create Azure Functions in Visual Studio and log in with your Microsoft (MS) credentials. Doing so will create a pathway to the Azure cloud.
What Is QuickBooks?
QuickBooks is an accounting software package that handles a business’s monetary requirements and is most suitable for small-to-medium-sized organizations. This product, created by the main programming designer Intuit, permits you to oversee deals and costs, create reports, record charges, and a lot more. It offers a host of in-constructed reports that are easy to tweak and makes assuming responsibility for your accounts simple. Thus, for an adaptable and careful utilization of the accounting software, top-to-bottom information is fundamental about this product.
End-to-End Functionality
When a record is created and updated in Dynamics 365 CRM, that record will trigger Azure Functions to connect to QuickBooks API using .Net SDK and will perform CRUD operations on QuickBooks with serverless integration and return HTTP response in JSON format. We will use MS Flow (Power Automate) to leverage Azure Functions with Dynamics 365 CRM as a trigger.

How To Create Azure Functions Using Visual Studio
Step 1: Install Visual Studio 2019 community edition from the following link: https://visualstudio.microsoft.com/downloads/
Step 2: Add Azure cloud service module while installing; if you have Visual Studio 2019 already installed then just add Azure Function module in Visual Studio 2019.
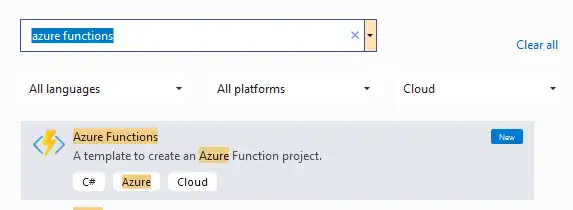
Step 3: Open Visual Studio 2019 when installation is complete and click on New Project.
In the search bar above write: “Azure Functions” and you will see the Azure Functions option like this:
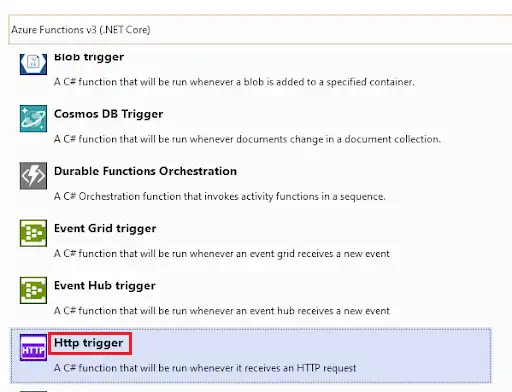
Step 4: Click on “Next” and provide the project name, location, and solution name. Upon clicking “Next” you will get trigger options, click on HTTP trigger and then click on Create.
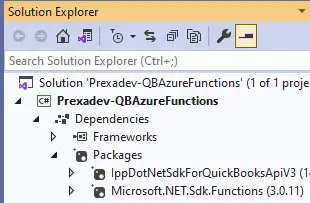
Step 5: Once Azure Functions is created successfully, you will see Azure Functions libraries automatically installed, which will help you to establish a connection with the Azure cloud service.
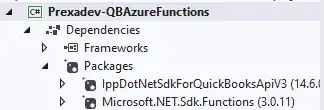
To confirm if packages are installed correctly, go to Solution Explorer and expand the dependencies option in your solution project and you will see the Microsoft.Net.Sdk. Function’s package installed in Packages.
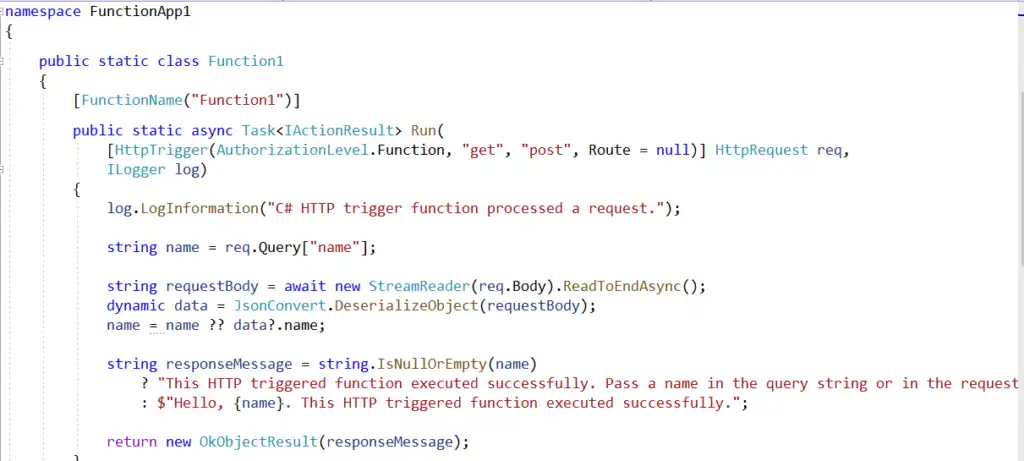
Once created, Azure Functions code will automatically be added, which will act as an HTTP endpoint.
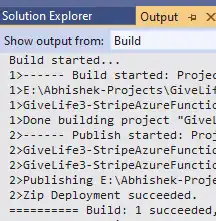
Step 6: Now open the Build option on the top menu bar and click on Build Solution or right-click on the project in Solution Explorer and click on the Build option. Open the Output folder and you will see Build successful without any errors.
Step 7: Next, run the project from the top menu bar by clicking on the FunctionApp1 option.
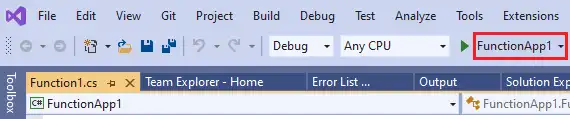
When clicking on FunctionApp1 option as highlighted in the above snapshot compiler will start building the project and once the build is successful compiler will start executing Azure Functions which will open a new command prompt and you will see the endpoint URL.
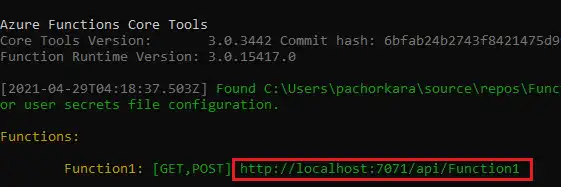
Open any browser and enter this endpoint URL. You will see a response message is printed on the screen. You can also pass parameters with URL.

Install QuickBooks.Net SDK API into Azure Functions
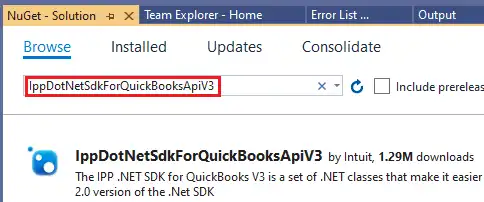
Open the Tools option in the top menu bar of Visual Studio 2019 and click on the NuGet Package Manager option. Click on Manage NuGet Packages for Solution.
In the browse type IppDotNetSdkForQuickBooksApiV3 and click on install.

Once successfully installed, you will see QuickBooks API libraries and packages installed in dependencies.
Create Application In QuickBooks Sandbox Company
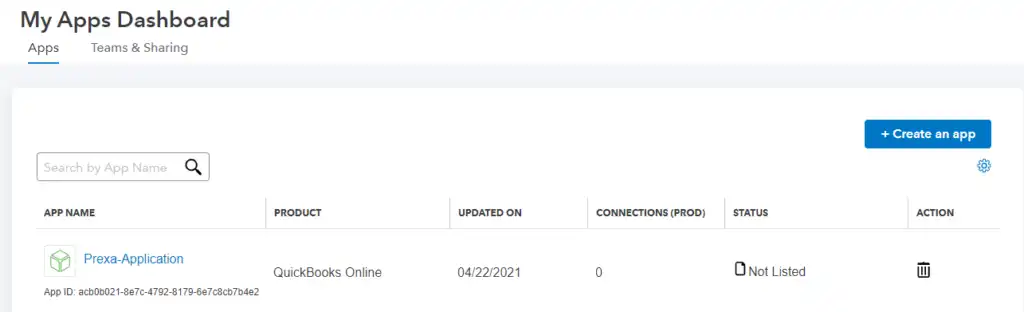
Next, you will create a Sandbox company in QuickBooks and a new application.
1. Open Dashboard by logging into QuickBooks developer login where you will find this page:
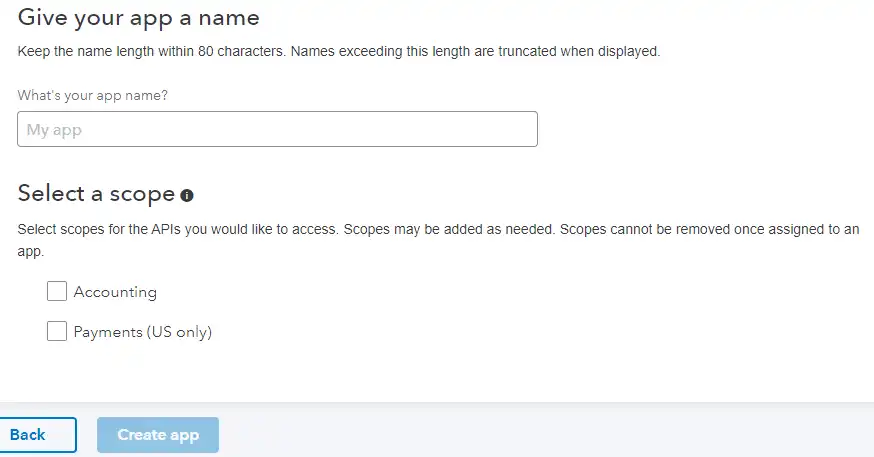
2. By clicking on Create App you can easily create a new application. Provide the application name and scope if you are building a QuickBooks API application for Canada and then select “accounting” under “scope”. For the US, click both “accounting” and “payments.”
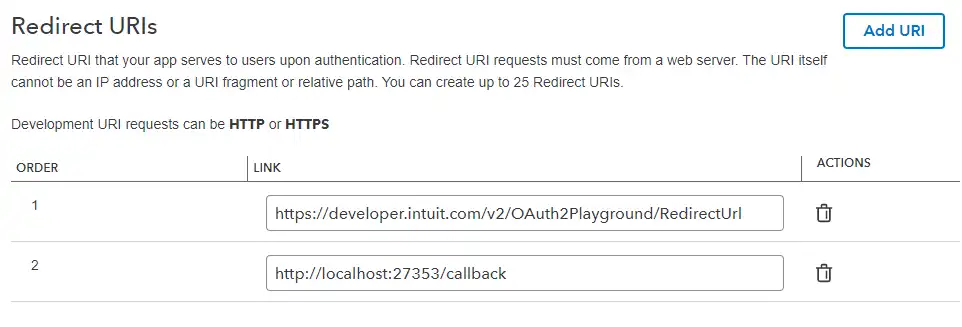
3. The next step is to add a redirect URL to the application. Redirect url is the url where your application runs on server if your application is running locally then provide localhost url else provide server url . This will be used in the Azure Functions later.
4. Now open QuickBooks playground where you will generate the first refresh token and access token which will be used by our Azure Functions. Refresh token and access tokens are basically authorization strings which are granted to client users to access web services. Once an access token is expired i.e after every 24 hours access token expires you can generate a new one using the refresh token. After each successful QuickBooks API call our Azure Functions will generate subsequent refresh tokens to make API calls and will be stored in CRM through MS flow.
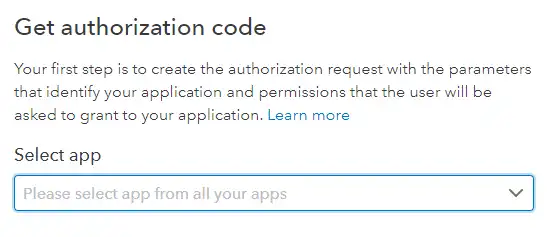
Open this link in the new tab
Select app from the dropdown
5. After selecting the app, QuickBooks Playground page will get the client id and client secret of your selected application. The client id and client secret are basically are identifiers associated with an application in our case it’s associated with the application which we created above.

6. Now select scopes if your company is American then select scope as Accounting and Payments both but for the rest all countries select Accounting.

7. Now click on the Get Authorization code which will navigate you to the QuickBooks company login page.
Log in with your credentials and the QuickBooks Playground page will create an authorization code and will auto-populate the company/realm id shown in the below snapshot.
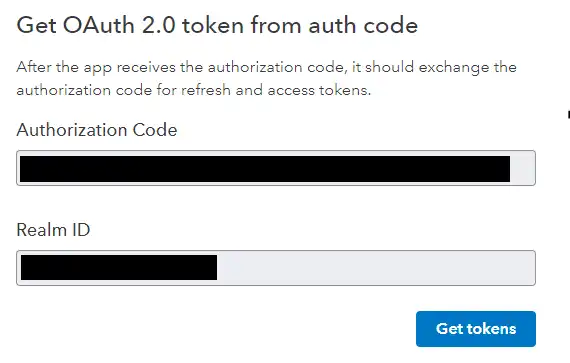
8. Click on “Get Tokens” and it will get refresh token and access token.
Copy the refresh token and save it somewhere which will be used in Azure Functions to make API call.
Now write code in Azure Functions using .Net SDK
Create configuration class or a config file in Azure Functions .net SDK for providing all configurations such as client id, client secret, redirect URL, company if, refresh token, or scope.
class QBServiceInitializer
{
public async Task {Tuple{ServiceContext ,string}} initializeServiceContext(QBConfigurations qBConfigurations)
{
OAuth2Client oauthClient = new OAuth2Client(qBConfigurations.QbClientId, qBConfigurations.QbClientSecret,
qBConfigurations.QbRedirectUrl, qBConfigurations.QbEnv); // environment is “sandbox” or “production”
//Prepare scopes
List scopes = new List();
scopes. Add (OidcScopes.Accounting);
//Get the authorization URL
string authorizeUrl = oauthClient.GetAuthorizationURL(scopes);
//Refresh token endpoint
var tokenResp = await oauthClient.RefreshTokenAsync(qBConfigurations.QbRefreshToken);
string refresh Token = tokenResp.RefreshToken;
OAuth2RequestValidator oauthValidator = new OAuth2RequestValidator(tokenResp.AccessToken);
ServiceContext serviceContext = new ServiceContext(qBConfigurations.QbCompanyId, IntuitServicesType.QBO,
oauthValidator);
serviceContext.IppConfiguration.BaseUrl.Qbo = qBConfigurations.QbBaseUrl;
serviceContext.IppConfiguration.MinorVersion.Qbo = qBConfigurations.QbMinorVersion;
return Tuple.Create(serviceContext, refreshToken);
}
}
Once the access token is received, we can make QuickBooks Online API calls
QBServiceInitializer qBServiceInitializer = new QBServiceInitializer();
Tuple<servicecontext, string=””> tuple = await qBServiceInitializer.initializeServiceContext(qbConfigurations);</servicecontext,>
SalesReceiptCRUD salesReceiptObj = new SalesReceiptCRUD();
tuple.Item1.RequestId = Helper.GetGuid();
salesReceiptQbId = salesReceiptObj.SalesReceiptAddTestUsingoAuth(tuple.Item1, salesReceipt);
As Azure function successfully been developed you need to publish your Azure function in azure tenant.
Here is Educational resource on how OAuth 2.0 works, relevant for QuickBooks app token flow.
Publish Azure Functions
Right-click on the Azure Functions project in Visual Studio and click on Publish.

1. Provide any app name and select subscription, resource group, and storage plan, and then click on Create.
2. Once the App profile is created, then finally click on Publish.

3. Now sign in to the Azure portal by entering credentials. You will see the Azure Functions resource created in this subscription.
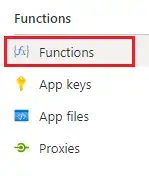
You can see these functions created which are in the enabled state. Click on any function to proceed further.

4. Check for Azure Functions URL, which you will use in MS flow further to call Azure Functions from the application or Dynamics 365 CRM by clicking on Get Function Url.

5. Click on Configuration for adding configurations for your Azure Functions which you will get inside your Azure Functions code.
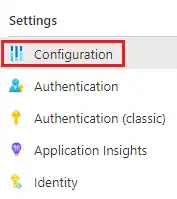
6. Click on New Application Setting for creating configuration parameters.
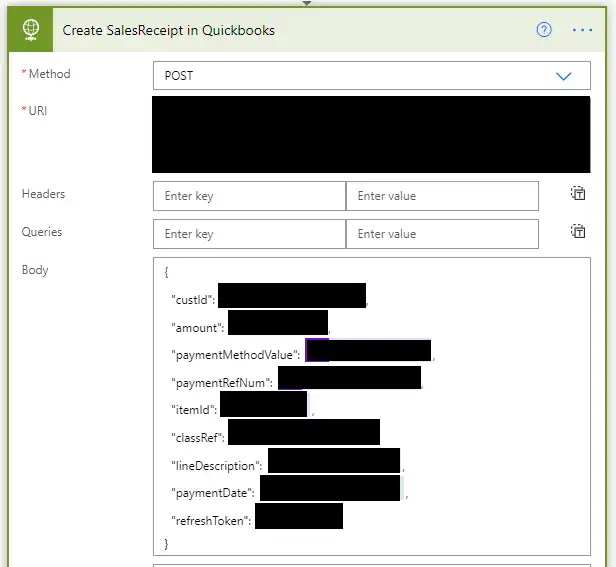
7. Now create MS flow with any trigger point such as create/update. Inside your Azure Functions add step Http Request
Inside URI enter Azure Functions URL and in body pass JSON object which you want to send as request parameter to Azure Functions.
Sum it up
In this blog, you learned how to create an application in your QuickBooks sandbox/production company, how to create Azure Functions in Visual Studio, and how to publish it to the cloud. Then you were taught how to access the Azure Functions inside your MS flow to trigger your Azure Functions and perform the CRUD operation into QuickBooks and get a response back.
Need a smoother way to connect QuickBooks with Dynamics 365?
Sync your financial data with Azure and Dynamics 365 to simplify accounting, improve accuracy, and save time.
FAQs
What Is the Purpose of QuickBooks Integration with Dynamics 365?
QuickBooks Integration with Dynamics 365 connects your accounting software with your CRM and ERP platform. First, it eliminates duplicate data entry between two systems. Finance teams update records in QuickBooks. Sales and operations teams work in Dynamics 365. Second, the integration keeps both platforms synchronized in real time. Additionally, invoice data, customer records, and payment statuses stay consistent across systems.
Moreover, finance managers get a unified view of customer transactions without switching tools. Furthermore, automated data flows reduce human error significantly. As a result, your business operates with cleaner data and faster financial processes. Our Power Automate implementation team in Toronto builds these integration workflows for businesses of all sizes.
How Does Azure Functions Help Connect QuickBooks to Dynamics 365?
Azure Functions acts as the middleware layer that transforms data between QuickBooks and Dynamics 365. First, it receives webhook events from QuickBooks when a new invoice or customer record appears. Second, the function transforms the data structure to match Dynamics 365's API schema. Additionally, Azure Functions manages authentication tokens for both platforms. This keeps credentials secure and reduces manual token management.
Moreover, the serverless architecture means you only pay for what you use. There are no servers to maintain or scale manually. Furthermore, Azure Functions retries failed operations automatically. This improves reliability without extra developer effort. As a result, data transfers run reliably without manual monitoring every day.
What Technologies Are Used to Build This Integration?
The integration stack for connecting QuickBooks with Dynamics 365 includes several proven technologies. First, Azure Functions provides the serverless compute layer. Second, Power Automate handles simpler workflow automation between the two platforms. Additionally, the QuickBooks Online API and Dynamics 365 Web API serve as the connection endpoints. Moreover, Azure Key Vault stores API credentials and tokens securely.
For QuickBooks integration with Dynamics 365, these technologies work together as a low-maintenance solution. Furthermore, Azure Service Bus adds message queuing for high-volume scenarios. This ensures no data loss if one system goes temporarily offline. As a result, the integration is resilient and enterprise-ready from day one.
Is the Integration Secure and Scalable for Business Growth?
Yes, the integration is both secure and scalable. First, Azure Key Vault stores all API credentials. No secrets appear in code or configuration files. Second, all communication between QuickBooks and Dynamics 365 uses HTTPS and OAuth 2.0. Additionally, Azure's infrastructure scales automatically to handle higher transaction volumes. You do not need to provision extra resources manually.
Moreover, role-based access controls limit which users can trigger or modify integration flows. Furthermore, Azure audit logs track every data transfer for compliance. As a result, the integration meets enterprise security standards. Our Business Central implementation team in Mississauga adds ERP-layer controls to strengthen this architecture further.
What Data Can Be Synced in a QuickBooks Integration with Dynamics 365?
A QuickBooks integration with Dynamics 365 syncs a wide range of business data. First, customer and contact records move between the two systems when teams create new accounts. Second, invoices from Dynamics 365 push automatically to QuickBooks for accounting. Additionally, payment confirmations from QuickBooks update transaction statuses in Dynamics 365. This keeps both teams informed without manual updates.
Moreover, product catalog data synchronizes to keep pricing consistent. Furthermore, vendor and supplier records share between platforms without re-entry. As a result, finance and operations teams work from the same dataset. In contrast, disconnected systems produce outdated records and costly reconciliation errors at month-end.
Do I Need Coding Experience to Set Up This Integration?
The coding requirement depends on your chosen integration approach. First, Power Automate offers a no-code path for basic data synchronization. You connect QuickBooks and Dynamics 365 using pre-built connectors. No programming knowledge is necessary. Second, Azure Functions requires basic C# or JavaScript knowledge for complex transformations. Additionally, the QuickBooks Online API requires understanding of REST API concepts.
Moreover, Dynamics 365 Web API calls use JSON data structures. These are learnable but need some developer familiarity. However, AlphaVima handles all technical implementation for clients who prefer a fully managed approach. As a result, your team focuses on business outcomes while we manage the technical integration layer.
What Are the Business Benefits of QuickBooks Integration with Dynamics 365?
QuickBooks integration with Dynamics 365 delivers measurable business benefits. First, it saves several hours per week by eliminating double data entry. Finance and sales teams stop re-entering the same information. Second, faster invoice processing improves your cash flow cycle directly. Additionally, real-time data synchronization gives managers accurate reports without waiting for manual updates. Moreover, fewer data entry errors reduce month-end reconciliation time.
Furthermore, both teams gain visibility into the full customer lifecycle from first contact to final payment. As a result, decision-making improves and customer service becomes more responsive. Our nonprofit CRM team in Toronto deployed similar integrations for organizations with specialized accounting needs. Contact AlphaVima to discuss the right integration model for your business.
Can the Integration Be Customized for Specific Business Workflows?
Yes, you can fully customize the integration to match your specific workflows. First, you configure which data fields sync between QuickBooks and Dynamics 365. Not every field needs a mapping. Second, you apply business rules to filter records. For example, only invoices above a certain value trigger an automated sync. Additionally, custom error handling routes failed transactions to a review queue instead of dropping them silently.
Moreover, you extend the integration to include other platforms like SharePoint or Microsoft Teams for notifications. Furthermore, AlphaVima builds modular integrations that teams update easily as business processes evolve. As a result, the solution grows with your organization over time. Review the QuickBooks Developer documentation for a full overview of available API capabilities.