


Uploading documents to Dynamics 365 using PowerApps can be a secure and streamlined experience with the right setup. In this guide, we demonstrate how to set up secure file upload in PowerApps so users can easily attach documents to records while maintaining data integrity.
Whether you’re configuring a new PowerApps Portal or integrating with an existing Dynamics 365 system, this method ensures seamless file handling without compromising security. This tutorial is perfect for administrators and developers seeking to upload files to Dynamics 365 securely via PowerApps Portal.

Step 1: Create the File Upload Form
In this example, we’re creating a simple form with a file input field and an upload button. This form will allow users to select and upload files to Dynamics 365 directly from the Power Apps Portal. For more advanced file handling capabilities, you can explore the PCF File Uploader Control designed for PowerApps.
The HTML code below creates a section that includes:
– An `input` element of `type=”file”` where users can choose the file they want to upload.
– A button that triggers the file upload when clicked.
Here’s the HTML structure:
                           <section>

                               <div class="container" >
                                       <div class="row" >
                                           <div class="col-md-12" >
                                               <div class="form-group" >
                                                   <input type="file" id="resume" class="form-control"/ >
                                               </div >
                                               <div class="form-group" >
                                                   <button class="form-control" onclick="upload()" >Upload </button >
                                               </div >
                                           </div >
                                       </div >
                               </div >
                           </section >

Step 2: Get the Authentication Token
To upload files securely, we first need to retrieve an authentication token. Learn how Microsoft Sentinel enhances security in cloud applications. The code below demonstrates how to create a `getToken` function, which uses the `shell.getTokenDeferred()` method to obtain the token. This token will be required to authenticate the file upload request to the Dynamics 365 API.
Note: It’s crucial to follow secure file transfer practices. Refer to OWASP’s File Upload Cheat Sheet for comprehensive security guidelines.
                            const getToken = function () {
                                return new Promise((resolve, reject) => {
                                    shell.getTokenDeferred().done(token => {
                                        resolve(token);
                                    }).fail(error => {
                                        reject(error);
                                    });
                                });
                            }
Step 3: Implement the `uploadFile` Function
The `uploadFile` function is where the main file upload logic resides. Here’s a breakdown of how this function works:
- File Selection: The function retrieves the file from the file input element by using its `ID`.
- Token Retrieval: It calls the `getToken` function to get an authentication token.
- File Validation: If no file is selected, it returns a message indicating no file was uploaded.
- File Processing: The function reads the file as an ArrayBuffer, which allows it to be uploaded as a binary data stream.
- API Call: Using the Fetch API, it sends a `PATCH` request to Dynamics 365’s Web API with the ArrayBuffer as the `body`. It includes the authentication token and the file name in the headers.
                            const uploadFile = async function (fileInputID, fieldLogicalName, guid) {
                                return new Promise(async (resolve, reject) => {
                                    const fileInput = document.getElementById(fileInputID);
                                    const file = fileInput.files[0];
                                    const token = await getToken();
                                    if (!file) {
                                        resolve({ "success": "No file selected." });
                                        return;
                                    }
                                    const fileReader = new FileReader();
                                    fileReader.readAsArrayBuffer(file);
                                    fileReader.onload = async function (event) {
                                        const fileArrayBuffer = event.target.result;
                                        const fileName = file.name;
                                        try {
                                            const apiUrl = `/_api/contacts(${guid})/${fieldLogicalName}`;
                                            const response = await fetch(apiUrl, {
                                                method: 'PATCH',
                                                headers: {
                                                    'Content-Type': 'application/octet-stream',
                                                    'x-ms-file-name': fileName,
                                                    '__RequestVerificationToken': token
                                                },
                                                body: fileArrayBuffer
                                            });
                                            if (!response.ok) {
                                                throw new Error(`Error uploading file: ${response.statusText}`);
                                            }
                                            resolve({ "success": "File uploaded successfully." });
                                        } catch (error) {
                                            reject({ "error": `Error uploading file: ${error}` });
                                        }
                                    };
                                    fileReader.onerror = function () {
                                        reject({ "error": "Failed to read the file. Please try again." });
                                    };
                                });
                            };
Step 4: Upload File on Button Click
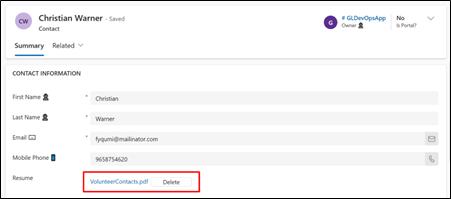
- The `upload` function, triggered by the button click, calls `uploadFile` with the file input ID (`resume`) and the field logical name in Dynamics 365 where the file will be stored (e.g., `av_resume`) and the GUID of record where we will store the file. In our case we are taking GUID of logged in person and will attach file in Resume field.
                            async function upload() {
                              const recordGUID =  {{ user.id }}; //we will take GUID of loggedin person
                              var res = await uploadFile('resume', 'av_resume', recordGUID);
                              console.log(res);
                            }

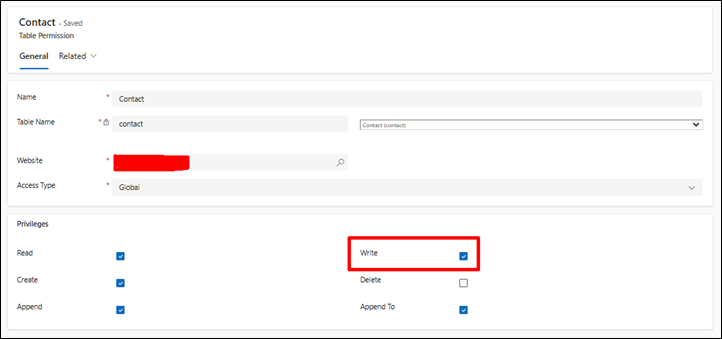
Make sure you have Write privilege for related entity. If you are migrating from on-premise to cloud, explore Cloud Enablement Services for seamless integration.
FAQs
How can I enable file uploads in Power Apps Portal for Dynamics 365?
Set up a file input field and use JavaScript and the Web API to allow file uploads directly from the Power Apps Portal.
What type of files can be uploaded to Dynamics 365 using Power Apps Portal?
Standard file types such as PDF, DOCX, and images are generally supported, depending on Dynamics 365 configurations.
Do I need special permissions to upload files to Dynamics 365 via Power Apps Portal?
Yes, you need write permissions on the entity in Dynamics 365 where files will be stored.
How is authentication handled for file uploads in Power Apps Portal?
Use an authentication token from shell.getTokenDeferred() to secure the upload requests to the Dynamics 365 API.
Can multiple files be uploaded to Dynamics 365 through Power Apps Portal?
Multiple files can be uploaded by repeating the file upload process for each file individually.
Where are uploaded files stored in Dynamics 365 after uploading?
Files are attached to specified fields or entities in Dynamics 365, such as the Contact entity’s file-type field, as defined during setup.