


With the release of Dynamics 365 v9.0, Microsoft introduced a new data type – Multi-Select Option Set. With the help of this new data type, we can select more than one option set in Dynamics 365.
The Power Apps Portal/Dynamics Portal does not support multi-select option field types out-of-the-box. To better understand Microsoft’s cloud-based CRM systems, check out our guide on Microsoft Power Platform. The work around is to create a dummy multi-select option set field in Entity Forms and Web Forms at whichever places you want to use. With some amount coding, you can demonstrate a particular pattern that can be used to add sophisticated UI elements to your Portal.
In this blog we will show how to display Multi-Select Option Set Field on Portal Apps and how to set Multi-Select Option Set value in Microsoft Dynamics CRM from Portal.
How to Set Up Multi-Select Option in Power Apps Portal and Integrate with Dynamics 365 CRM:
Step 1:
Here’s what you need to do:
> Create a text-field in CRM for portal internal use.
> Add that created field into entity form and hide that field on entity form.
Now comes the actual programming part. By using the below code, we can create a dummy multi-select option set in portal by using the same option values of original multi-select option field.
Step 2:
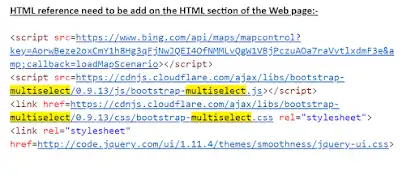
Add the required html references to web pages.
Step 3:
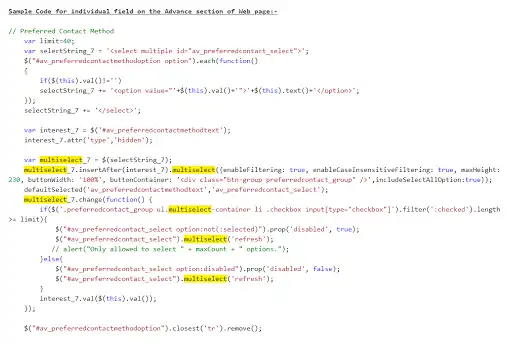
Below is the sample code to create a multi-select option set field in portal.
Change the IDs of fields as per the fields you are using.
Step 4:
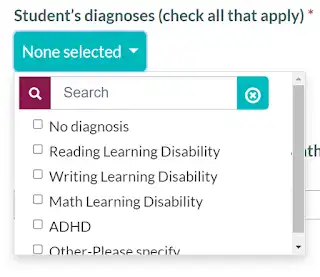
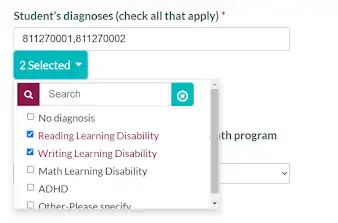
After successfully executing the above steps, you should see the output as displayed below. The output will display below the text field that you had created earlier in the CRM (refer Step 1).
Step 5:
Write the code to add the selected options to hidden text field as shown below. Using those values (each option contains separate value, if not, it means you have to add a value to each option when you are creating options) you should update the field in CRM as well.
How to Update Selected Values in CRM:
Step 1: On Create this record (Ex: I’m using this multi-select option set on contact form, so when I’m creating or updating contact record) trigger a Microsoft flow.
Step 2: Get the values of the hidden textbox and check in the Microsoft flow the selected option values are retrieved or not.
Step 3: After step 1, if values are retrieved means, update the record and set the retrieved values to the original multi-select option set field in the Microsoft flow.
Step 4: Run the flow and check the output. The values will set in multi-select option set field in Microsoft CRM as shown below.

We hope this was useful. Learn more about Multi-select in Portals here.
Need help building advanced forms in Power Apps?
Learn how to use multi-select options effectively or get expert help customizing your Power Apps solutions.
FAQs
What Is the Multi-select Option in Power Apps Portal and How Does It Work?
The Multi-select option in Power Apps Portal lets users choose multiple values from a single form field. It maps directly to a Dataverse multi-select option set column. Users see a list of checkboxes or a multi-select dropdown on the portal form. Each selected value stores as a comma-separated list of integer codes in Dataverse. This differs from a standard lookup field that holds only one related record. Multi-select fields are common in forms that capture preferences, categories, or issue types. For example, a support form lets users pick multiple problem categories at once. AlphaVima's Power Apps developers in Toronto build these forms with proper validation and error handling. This ensures every selected value saves reliably on submission.
How Do You Enable the Multi-select Option in Power Apps Portal Forms?
You can enable the Multi-select option in Power Apps Portal through the Portal Management app. First, add the multi-select option set column to your model-driven app form. Next, open the Basic Form or Advanced Form record in the Portal Management app. Add the column to the form definition with the correct field type. Power Pages renders multi-select option sets as a group of checkboxes by default. Refresh the portal cache after making changes to the form configuration. Then test the form in a portal preview session to confirm it appears correctly. Verify that multiple selections save to the Dataverse record after submission. Always test at least three different selection combinations to catch data mapping issues early.
Can You Store Multi-select Values in Dataverse Without Plugins?
Yes, Dataverse stores multi-select values natively without plugins or custom extensions. The platform has a built-in multi-select option set data type. Each option carries a unique integer value defined in the column settings. Dataverse saves selected values as a comma-separated list of those integers. Power Apps Portal handles reads and writes automatically through the form submit event. You do not need any server-side code to support this behavior. However, you must map the portal form column to the correct Dataverse column name. Also, configure entity permissions to grant Create and Write access on the table. Without correct permissions, form submissions fail silently and selected values are lost.
What JavaScript Is Needed for Advanced Multi-select Portal Configurations?
Custom JavaScript helps you extend the Multi-select option in Power Apps Portal beyond default behavior. You can pre-select values based on the current user's profile or URL parameters. Use the portal form's web form step events to fire your script at load time. Access the checkboxes using their column logical name in a querySelector call. Then set the checked property on the correct checkbox input elements. Trigger a change event afterward to notify the form of the selection. Keep scripts short and well-commented for easy future maintenance. Test in a staging environment before deploying to production. Our Power Platform specialists in Toronto write and maintain these scripts for portal clients regularly.
How Do Multi-select Portal Fields Connect to Power Automate Flows?
Power Automate flows receive multi-select option set values from Dataverse as integer arrays. When a portal form submits, a flow can trigger on the new or updated Dataverse record. The flow reads the multi-select column and gets a list of selected option integers. Use a string split action to process each selected value individually. Apply conditions to route the flow based on those values. For example, route a support ticket to different queues based on selected issue categories. Always test your flow with multiple selection combinations to confirm correct routing. Ensure the Dataverse connector has Read permission on the relevant table. Log flow runs during testing so you can trace any unexpected behavior or routing decisions.
What Are Common Errors When Configuring Multi-select Fields on Portals?
Several errors occur when multi-select fields are not configured correctly on portal forms. The most common issue is selected values not saving after form submission. This usually means the entity permission is missing Write access on the column. Another issue is the portal rendering the field as a plain text input instead of checkboxes. This happens when the Dataverse column type is set incorrectly or the form field type is wrong. JavaScript conflicts can also interfere with the checkbox behavior. Check the browser console for error messages after every configuration change. Additionally, mismatched option set values between environments cause broken data during solution imports. Our CRM configuration team in Toronto diagnoses and resolves these issues efficiently.
How Does AlphaVima Configure the Multi-select Option in Power Apps Portal?
AlphaVima configures the Multi-select option in Power Apps Portal through a structured, repeatable consulting process. We start with a discovery session to understand your form requirements and data model. Then we review your Dataverse schema and confirm the multi-select column definition. Our developers add the column to the portal form and configure the correct rendering type. We write any required JavaScript and test it across multiple browsers. We also configure entity permissions so selections save correctly for every user role. After deployment, we verify the data appears correctly in Dataverse views and dashboards. Review the official Microsoft Power Pages documentation on entity forms for platform capabilities. AlphaVima ensures your portal forms work reliably in every production scenario.
Can You Filter Entity List Records by Multi-select Field Values in Portals?
Yes, you can filter entity list records by multi-select option set values in portal views. Use FetchXML with the contain-values condition operator to query records with specific options selected. Add the filter to your entity list view inside the Portal Management app. Users then see only records that match a chosen category or tag. This approach is useful when portals display large data sets that need focused results. You can also expose the filter as a search widget directly on the portal page. Test filter results with both single and multiple selected values before going live. Furthermore, proper filtering improves page load times by reducing the result set. Using the Multi-select option in Power Apps Portal this way adds powerful self-service search to your portal.