


Modern enterprise integrations demand reliability. When you need to pass data between systems – whether it’s a Power Platform trigger feeding a backend process, or an ERP system notifying Power Automate of a completed transaction – you need a messaging layer that guarantees delivery, handles retries, and decouples the sender from the receiver. Azure Service Bus is that layer.
In this guide, you will learn how to set up an Azure Service Bus namespace and queue, connect it to Power Automate using the native Service Bus connector, and build flows that both send messages to and receive messages from a queue – enabling fully event-driven integrations between Power Platform and any external system. This pattern is part of Alphavima’s Microsoft Power Platform consulting and Azure data engineering services for enterprise customers.
What Is Azure Service Bus?
Azure Service Bus is a fully managed enterprise message broker. It supports:
- Queues – point-to-point messaging where one sender delivers to one receiver
- Topics and subscriptions – publish-subscribe messaging where one sender delivers to multiple receivers
- Dead-letter queues – failed messages are held for inspection rather than lost
- Message sessions – ordered, FIFO message processing for complex workflows
Power Automate connects to Service Bus via the built-in Azure Service Bus connector, which supports both sending messages (from a flow) and triggering flows when new messages arrive.
For teams already using Power Automate for data movement, pairing this with Power Automate flow versioning best practices ensures your message-driven flows remain auditable and maintainable.
Prerequisites
- An Azure subscription with permission to create resources
- A Power Automate licence (Per User, Per Flow, or Microsoft 365 included)
- Basic understanding of Power Automate flows
- An existing application or system to integrate with (or use a manual trigger for testing)
Architecture Overview
The integration pattern in this guide follows:
- Sender flow: Power Automate (triggered by SharePoint/Dataverse/manual) sends a message to Azure Service Bus queue
- Azure Service Bus holds the message reliably, handles retries
- Receiver flow: A second Power Automate flow is triggered when the message arrives, processes it, and writes to the target system
This decoupled architecture means the sender flow does not need to wait for the receiver to be available – Service Bus handles the queuing. The same async pattern underpins our Business Central API integration with Power Automate and our Teams Adaptive Card approval flows.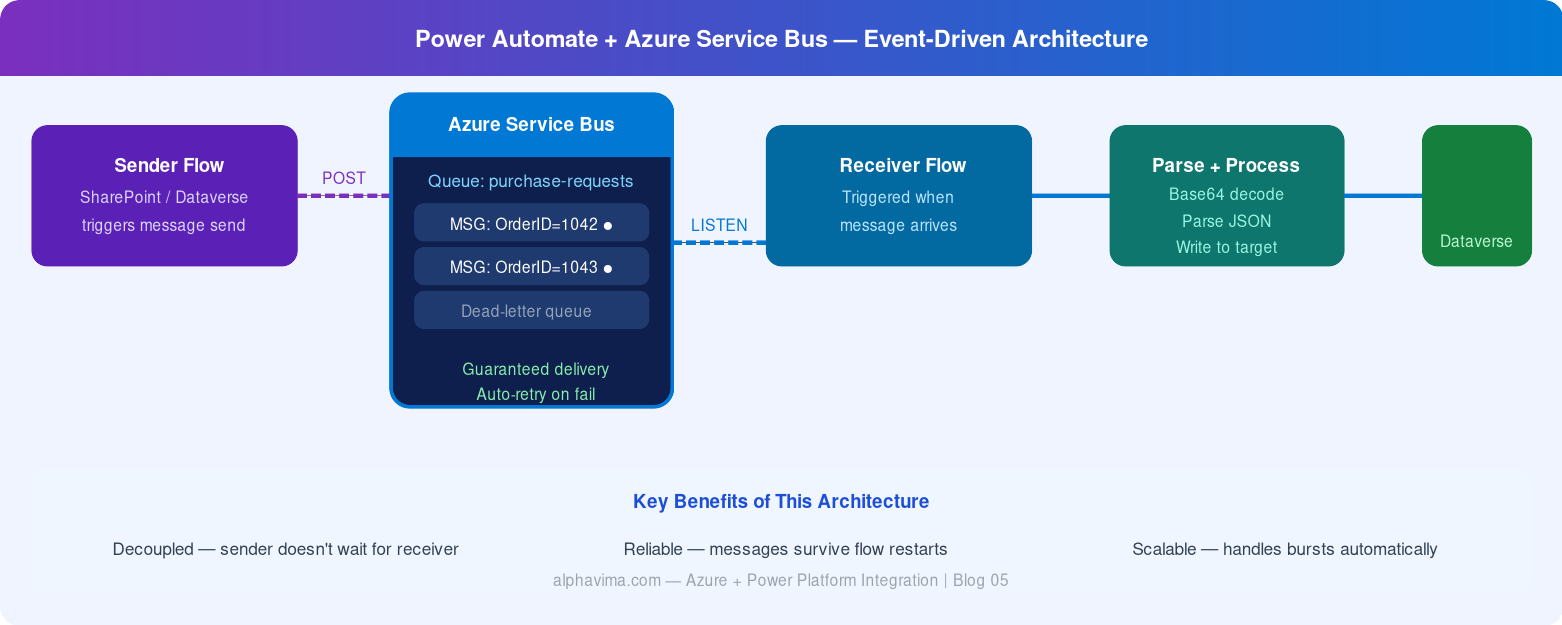
Part 1: Set Up Azure Service Bus
Step 1: Create a Service Bus Namespace
- Log in to the Azure Portal.
- Click Create a resource → search for Service Bus → click Create.
- Fill in the form: Subscription, Resource Group, Namespace name (e.g.,
alphavima-servicebus), Location, Pricing tier: Standard (required for topics) - Click Review + Create → Create.
Wait 1–2 minutes for deployment to complete.
Step 2: Create a Queue
- Open your new Service Bus namespace in the Azure Portal.
- In the left menu, click Queues → + Queue.
- Configure: Name (
purchase-requests), Max queue size: 1 GB, Message time to live: 14 days, Lock duration: 30 seconds. Enable Dead lettering on message expiration. - Click Create.
Step 3: Get the Connection String
Power Automate needs a connection string to authenticate with Service Bus.
- In your namespace, go to Shared access policies.
- Click RootManageSharedAccessKey.
- Copy the Primary Connection String.
Security tip: For production environments, create a dedicated shared access policy with only Send or Listen permissions (not Manage) and use that connection string in Power Automate.
Part 2: Build the Sender Flow (Power Automate → Service Bus)
Step 1: Create the Flow
- Go to make.powerautomate.com.
- Click Create → Automated cloud flow.
- Name it: “Send Purchase Request to Service Bus”
- Trigger: “When an item is created” (SharePoint) or use “Manually trigger a flow” for testing.
- Click Create.
Step 2: Add the Service Bus “Send Message” Action
- Click +New step.
- Search for “Azure Service Bus”.
- Select action: “Send message”.
- When prompted to create a connection: Connection name:
ServiceBus-AlphaVima, paste the connection string from Step 3 above. - Click Create.
Step 3: Configure the Message
In the Send message action, configure:
- Queue/topic name: Select your queue (
purchase-requests)
Content: Build a JSON message using dynamic content from your trigger. For example:
{
“RequestId”:
“@{triggerOutputs()?[‘body/ID’]}”,
“Title”:
“@{triggerOutputs()?[‘body/Title’]}”,
“Amount”:
“@{triggerOutputs()?[‘body/Amount’]}”,
“RequestedBy”:
“@{triggerOutputs()?[‘body/Author/DisplayName’]}”,
“Timestamp”:
“@{utcNow()}”
}
- Content Type:
application/json - Label/Subject:
PurchaseRequest(optional – useful for filtering)
Test by manually triggering the flow or adding a SharePoint item. Check your Service Bus queue in the Azure Portal – the Active message count should increment.
Part 3: Build the Receiver Flow (Service Bus → Target System)
Step 1: Create the Receiver Flow
- Create a new Automated cloud flow.
- Name it: “Process Purchase Request from Service Bus”
- Trigger: Search for “Azure Service Bus” → select “When a message is received in a queue (auto-complete)”.
- Select your connection and queue name. Click Create.
Auto-complete vs Peek-lock: Auto-complete deletes the message after the flow runs successfully. Peek-lock keeps the message locked while processing – use this for complex error handling.
Step 2: Parse the Message Content
Service Bus delivers message content as a Base64-encoded string. You need to decode it first.
- Add action: “Compose” (Data Operations). Expression:
base64ToString(triggerBody()?['ContentData']) - Add action: “Parse JSON” (Data Operations).
- Content: Use the output of the Compose action.
- Schema: Click Generate from sample and paste your message JSON.
{
“RequestId”: “123”,
“Title”: “Laptop Purchase”,
“Amount”: “1500”,
“RequestedBy”: “Alice Smith”,
“Timestamp”: “2025-04-01T10:00:00Z”
}
- Click Done.
Step 3: Process the Message
Now you can use the parsed fields as dynamic content in downstream actions:
- Write to Dataverse – Create a new record using the parsed fields
- Send approval in Teams – Trigger an approval workflow (see our Teams Adaptive Card approval guide)
- Call an HTTP endpoint – Forward the data to an external API
- Update a SQL record – Connect to your database via the SQL Server connector
Step 4: Handle Errors Gracefully
- Add a Scope action wrapping your processing steps.
- After the Scope, add a Condition to check if the Scope succeeded.
- If No (error): Add the “Send message to dead letter” action or log the error to a SharePoint list.
This ensures failed messages are not silently lost.
Testing the End-to-End Flow
- Trigger your sender flow (add a SharePoint item or use manual trigger).
- Check the Azure Portal – the queue’s Active message count should momentarily show 1.
- The receiver flow should trigger automatically within seconds.
- Verify the target system received the data (Dataverse record created, etc.).
- Check both flow run histories for any errors.
Best Practices
- Use separate connection strings for Send and Listen operations – follow least-privilege principles
- Set message TTL appropriately – don’t leave messages to expire silently without alerting
- Monitor dead-letter queues – set up a Power Automate flow to alert your team when messages end up in dead-letter
- Use message sessions for scenarios requiring ordered processing (e.g., sequential order line processing)
- Version your message schemas – include a
schemaVersionfield in your JSON so receiver flows can handle changes gracefully
Conclusion
Azure Service Bus paired with Power Automate gives you enterprise-grade, reliable message-based integration without the complexity of building and maintaining a custom integration layer. Whether you are connecting Power Platform to a backend ERP, syncing data between cloud services, or decoupling high-volume automation flows, this pattern is robust, scalable, and fully observable.
Combine this with D365 CRM SQL connections and your enterprise integration stack becomes a genuinely powerful, maintainable architecture. For more reusable Power Platform consulting locations, browse our Power Apps consulting in your city directory.
Want help architecting an integration solution using Azure Service Bus and Power Platform? The AlphaVima team can design, build, and support your entire integration layer. Contact our Power Platform consulting team today.