


What Is Azure Service Bus?
Standard email approvals are slow, easily missed, and provide no context at a glance. Microsoft Teams paired with Power Automate Adaptive Cards changes this completely – approvers see a rich, structured card with all relevant information and can approve or reject with a single click, directly inside Teams, without leaving their workflow.
In this guide, you will learn how to build a Power Automate flow that sends a fully formatted Adaptive Card approval request to a Teams channel or a specific user, captures the response, and takes action based on the outcome. This pattern is part of Alphavima’s broader Microsoft Power Platform consulting work for enterprise customers.
Why Adaptive Cards Over Standard Approvals?
Power Automate’s built-in Approvals connector is great for simple scenarios, but Adaptive Cards give you:
- Full visual control – display tables, images, dropdown fields, and colour-coded status indicators
- Inline response – approvers respond without leaving Teams
- Dynamic data – populate cards with live data from SharePoint, Dataverse, or any connector
- Custom actions – go beyond Approve/Reject to multi-choice scenarios
For flows that deal with sensitive business data, Adaptive Cards are also faster to audit – you can check responses in Power Automate flow run history at any time.
Prerequisites
- A Power Automate licence (Per User, Per Flow, or included in Microsoft 365)
- Microsoft Teams with the Power Automate app installed
- A SharePoint list or Dataverse table as your trigger source (or use a manual trigger for testing)
- Basic familiarity with Power Automate flow building
How the Flow Works
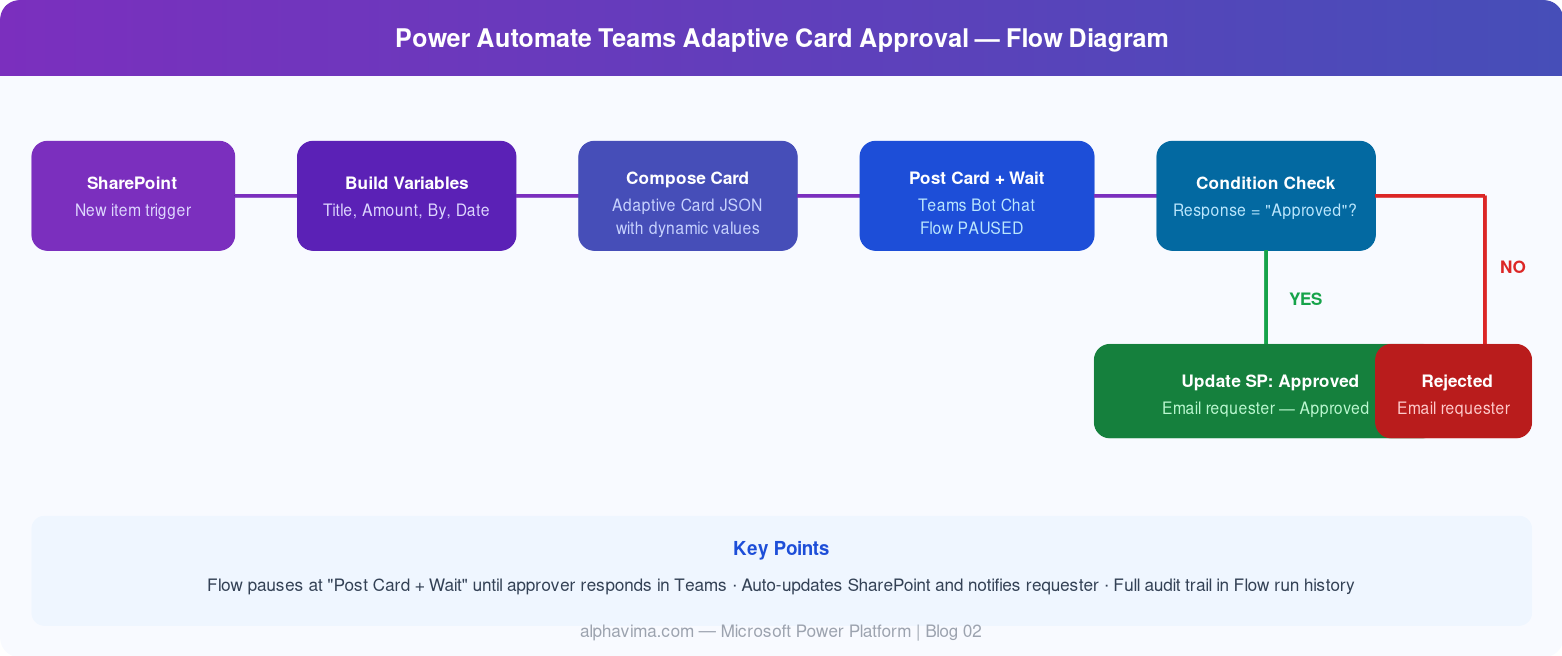
The flow follows this sequence:
- Trigger: A new item is added to a SharePoint list (e.g., a purchase request)
- Build the card: Compose the Adaptive Card JSON with dynamic values from the trigger
- Post the card: Send it to a specific Teams user or channel using “Post an Adaptive Card and wait for a response”
- Branch on response: Check whether the user approved or rejected
- Update the record: Write the decision back to SharePoint/Dataverse and notify the requester
Step 1: Create a New Flow
- Go to make.powerautomate.com.
- Click Create → Automated cloud flow.
- Name it “Teams Adaptive Card Approval”.
- Choose trigger: “When an item is created” (SharePoint connector).
- Select your Site Address and List Name (e.g., a “Purchase Requests” list).
- Click Create.
Step 2: Add Dynamic Variables
Before building the card, extract the fields you need from the SharePoint item.
- Click +New step → search for “Initialize variable”.
- Add variables for RequestTitle, RequestedBy, Amount, and RequestDate from SharePoint dynamic content.
Step 3: Build the Adaptive Card JSON
Adaptive Cards are defined in JSON. Use the free Adaptive Cards Designer to visually build your card, then paste the JSON into Power Automate. The card should include a FactSet with request details and two Action.Submit buttons for Approve and Reject.
Step 4: Post the Adaptive Card in Teams
- Click +New step → search for “Post an Adaptive Card and wait for a response” (Microsoft Teams connector).
- Configure: Post as: Flow bot, Post in: Chat with a Flow bot, Recipient: Enter the approver’s email.
- Paste your Adaptive Card JSON and set the update message to “Thank you – your response has been recorded.”
The flow will pause at this step until the user responds to the card in Teams.
Step 5: Handle the Response
After the card action, you have access to the approver’s response via dynamic content Body/data/response.
- Click +New step → Condition.
- Set:
Body/data/responseis equal toApproved. - If Yes: Update SharePoint Status to “Approved” and send confirmation email.
- If No: Update SharePoint Status to “Rejected” and notify requester.
Step 6: Update SharePoint and Notify
Inside both branches of the Condition, add “Update item” (SharePoint) to set the Status column, and “Send an email (V2)” (Outlook) to notify the requester. For flows that deal with Outlook email tracking, see our guide on tracking Outlook emails in Dynamics 365.
Step 7: Test the Flow
- Add a test item to your SharePoint list.
- Check the Flow run history to verify each step executed correctly.
- In Teams, you should see the Adaptive Card appear in the bot chat.
- Click Approve or Reject and verify the SharePoint item updates.
Advanced Enhancements
- Sequential approvals: Chain multiple “Post Adaptive Card” steps for multi-level approvals
- Timeout handling: Use the “Do until” action with a deadline to auto-reject expired requests
- Comments field: Add an Input.Text element to capture approver notes
- Mobile-friendly: Adaptive Cards render natively in the Teams mobile app
For more complex data orchestration, check our guide on exporting Power BI data to CSV via Power Automate.
Conclusion
Replacing email-based approvals with Teams Adaptive Cards is one of the highest-ROI improvements you can make to your approval workflows. Approvers get context-rich cards right inside their daily workspace, response rates improve dramatically, and you get a clean audit trail inside Power Automate’s run history.
The pattern you’ve built here – trigger, build card, wait for response, branch – is reusable across any approval scenario: expense reports, leave requests, contract sign-offs, or IT provisioning requests. For event-driven integrations beyond approvals, see our guide on connecting Power Automate to Azure Service Bus, or how to build a Power Apps custom connector when your approval payload needs to call an external REST API, and our walkthrough on the Business Central API + Power Automate integration.
Want help building custom approval workflows for your organisation? The AlphaVima team specialises in Power Platform solutions. Get in touch with our Power Platform team near you.